Hosting a public webcam from the roof of my house
Back in 2008, when Italy switched off its analogue TV signal, the government promised everybody that they could keep their aerials and simply buy a new television to continue watching. In reality, the transmitter of my area never worked properly, so everyone soon switched to satellite and rooftop poles were replaced with balcony dishes.
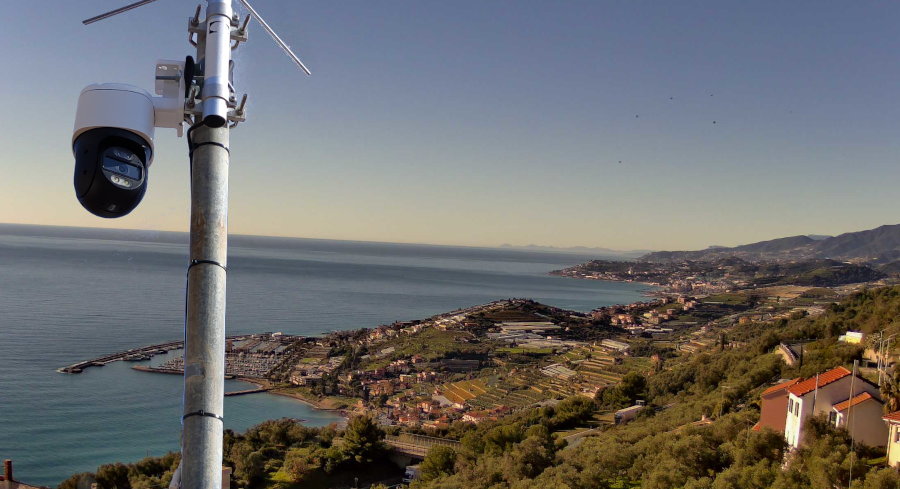
My father did the same, and when I discovered the newly available pole, I quickly took over it to run all kinds of experiments, especially with homemade antennas. Sixteen years later, I mounted a camera on top of the pole and made it vailable online for everyone to see.
Assessing the landscape
Most public cameras are simple: a single JPEG served on a webpage, with a timestamp, coming straight from the cgi-bin folder of an old camera. Others use fifteen second looping segments of a video feed refreshed every few minutes to fake the impression of real time video.

While this approach works and is enough if you want to just “glance” at the view, I wanted something that felt live. This meant finding a camera that not only had great quality but also gave me the purest stream to work with.
“Surveillance” cameras
Sadly, most consumer cameras available today are tied to their manufacturer’s ecosystem and have either no web interface or a very limited one. They require a relay server, only work if you have an account, and will eventually be locked behind a subscription once the manufacturer decides fun times are over.
My goal is not to run a security system, so I don’t need recording, movement detection, archival, or other smart “AI” features. I chose a security camera because they’re widespread and rugged enough to survive on a pole in the elements for years and the same definition you need to catch a burglar’s face will help you see details of the scenery clearly.
Fortunately, in 2008, Axis, Bosch and Sony created ONVIF, the “Open Network Video Interface Forum”. The idea is simple: any ONVIF-compatible camera exposes its stream in a standard way and supports discovery and provisioning from other ONVIF devices.
So, ONVIF it was.
Sony is still the king
While most sensors can produce a good image during the day, one of the goals of this camera is to watch the sunset and provide good images of the nearby port during the night. This means a good dynamic range (or the sun will darken everything) and efficient auto tuning algorithms to always show a good and consistent image at any light condition.
Sony is still the king of sensors and they have a specialized line called “Sony Starvis”. These sensors provide amazing dynamic range and a night vision that can still show colors at near pitch-black darkness.

We don’t actually need to buy a Sony camera, though. This sensor is provided by Sony to camera manufacturers, so you can still pick from plenty of different brands – it is very common to list the sensor model in the listing.
PoE
Using a PoE injector means only passing one cable that provides both power and data. It simplifies mounting and provides proper IP67 insulation. Additionally, even though cameras are designed to stay on all the time, bit-rot eventually happens and PoE-enabled equipment usually have automatic power cycling triggered by a watchdog.
This way, software halts (and some happened during these three years) turn into a brief downtime and a reboot.
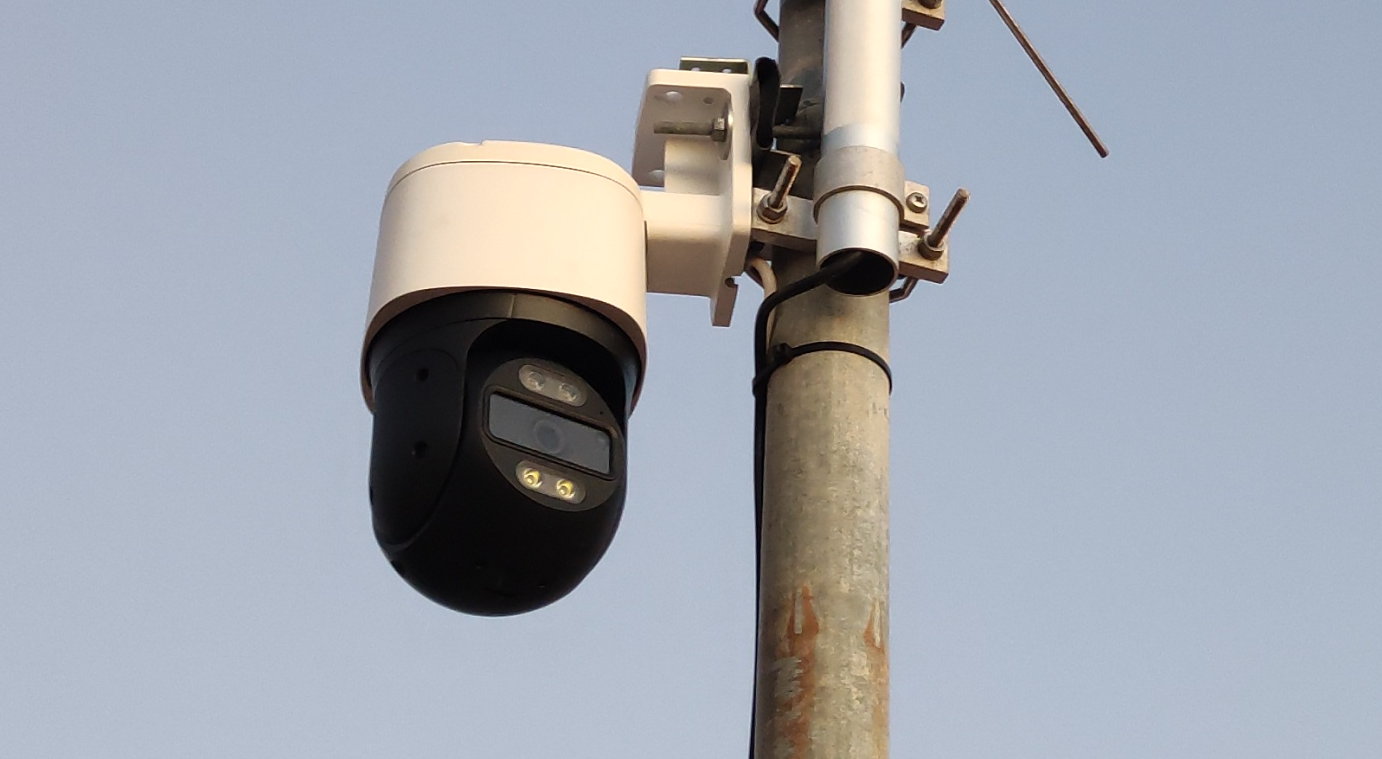
My choice
With a somewhat tight budget and eagerness to install as soon as possible, I bought a PTZ (pan, tilt, zoom, remotely steerable) camera from Reolink – the RLC-830A (now deprecated). Compared to other brands, it offers a very good quality at a decent price and still allows local control.
This choice came with additional benefits: I had already worked with them in the past (misused them as machine vision cameras), I knew the sensor was exactly what I needed, and while ONVIF was good enough, there also was a well-documented additional API.
Protecting and serving the stream
While the camera provides access to multiple users or guests via a login panel, exposing the whole camera interface just to show the view would be deeply insecure and cumbersome to operate. Thanks to ONVIF, however, we obtain a good quality stream served over RTSP (“Real Time Streaming Protocol”) that does not require a login.
RTSP is supported by many players, and in practice, it could be possible to stream it directly. However, there are some issues:
- Browsers do not support RTSP natively. Streaming RTSP would mean running a relay to turn it into WebSocket
- Cameras are not designed to serve many concurrent streams. I didn’t test how many this camera can handle, but i assume not many.
- Every RTSP stream sums together to upload bandwidth
- Botnets! There’s swarms of IoT devices with internet connections taken over by malicious actors to launch DDoS attacks. No way I’m gonna expose a camera to the internet.
Additionally, due to its distance to high-speed fiber, this camera is connected to an internet connection that only provides 30mbps of uplink. Even though the bandwidth needed to serve an almost-static panorama is not massive, only a couple of connected clients would saturate the uplink of the connection – which is, incidentally, also shared with other things in the house.
For this reason, I took some inspiration from the giants of streaming and used the technology that powers Youtube, Netflix and any IPTV in the world: HLS (“HTTP Live Streaming”).
HLS vs the rest
Traditional streaming works by creating a ring buffer: a virtual loop of tape that gets recorded over and over by the camera. Every person that wants to see the video will connect to the server, and the server will start sending data from their position on the loop.
The server needs to track the location of every connection and send packets according to the client needs. Most of the work is done by the server.
HLS, instead, shifts the work to the client: the stream is divided into 5-15 second segments with an ever-incrementing ID, and then a manifest is created that tells the users which pieces to download and play.
This turns a single stream into many static files that make large-scale distributing and caching very effective, as servers do not even need to support streaming videos or know what position the users are on.
The manifest, in case of a live stream, contains the latest pieces that were generated. Playing back the stream is very easy:
- Download the manifest
- Look at the ID of the last segment that was generated
- Download and play the segment
- Go to step 11
Everything happens over HTTPS, so not only it is compatible with most, if not all, modern browsers, but it is also rarely blocked by firewalls.
Using ffmpeg it’s easy to turn a RTSP stream into HLS. You give it the source stream and a destination folder, and it can do all of this on the fly, with no re-encoding:
$ ffmpeg -an -i rtsp://[...] -c:v copy -f hls \
-start_number 0 -hls_time 5 -hls_list_size 5 -hls_flags delete_segments \
/tmp/videodata/index.m3u8
Here’s what the command does:
-an: remove the audio-i rtsp://[...]: use this stream as the input-c:v copy: copy the video (do not re-encode) – needed to keep used CPU and memory low-f hls: format it into HLS segments-start_number 0: start numbering the segments from 0…-hls_time 5: …and make them 5 seconds long-hls_list_size 5: list at most five segments in the manifest…-hls_flags delete_segments: … and delete the oldest ones/tmp/videodata/index.m3u8: put the output index file here
This command runs forever and creates the needed structure in /tmp/videodata/: the manifest (index.m3u8) and a bunch of segments named indexXXX.ts, with XXX being the id.
For example, here’s the folder after about half a minute:
$ ls /tmp/videodata/
index1.ts  index2.ts  index3.ts  index4.ts  index5.ts  index6.ts  index.m3u8
The content of the manifest is straightforward:
#EXTM3U
#EXT-X-VERSION:3
#EXT-X-TARGETDURATION:6
#EXT-X-MEDIA-SEQUENCE:2
#EXTINF:5.999978,
index2.ts
#EXTINF:3.999978,
index3.ts
#EXTINF:5.999989,
index4.ts
#EXTINF:3.999978,
index5.ts
#EXTINF:5.999978,
index6.ts
Ignoring the top header that shows the version of the file, we have TARGETDURATION (which tells the player the expected length of the segments, so it can draw a proper seek bar), the MEDIA-SEQUENCE (starting segment ID) and then the first five segments, all with their name and running length.
The MEDIA-SEQUENCE is needed because the browser needs to know the ID of the first segment so that it does not skip or play segments twice. Notice how, despite not being included in the manifest anymore, “index1.ts” still exists on the disk. This is to make sure that every client has finished playing that piece before it’s deleted.
You will also notice that not all files have the exact length we specified in the command, and that’s expected: encoded video can only be split at keyframes, which are decided by the camera depending on the amount of movement and encoding settings.
Splitting the stream in different places without encoding would corrupt it, giving a result identical to datamoshing. Since we specified -c:v copy, ffmpeg refuses to split at non-keyframe boundaries, resulting in slightly variable segment lengths.
This folder can be served with any webserver. A client playing that manifest will automatically fetch the segments and reassemble them.
Serving the stream
While ffmpeg is running in a small server in the same location of the camera, the actual website is hosted on a VPS with a gigabit uplink. In this context, when I say “frontend” I’m not talking about a user interface, but rather a caching reverse proxy (the Nginx server) sitting between the users and the camera.
Everything, except for the actual video generation, is served by this frontend. When users request video segments, the frontend fetches them from the backend, caches them, and serves them.
However, setting up a basic caching server is not enough. Live streams present a unique timing problem: multiple viewers will request a brand new segment at the exact same time it’s generated, and that segment will become useless the moment it has played fully. This is why we need to tune it properly or we risk segments being cached only after everybody stops requesting them.
Thundering herd as a service
The goal of a caching web server is to provide resources to users as fast as possible. For this reason, if multiple users request a resource that isn’t yet in the cache at the exact same time, a standard server might open multiple direct connections to the backend to proxy it, only saving the file (and serving it cached) once the first connection finishes downloading.
This would be highly detrimental for the webcam use case. If 50 people request one fresh segment at the same moment, the server will open 50 concurrent connections to the backend. On a 30 Mbps uplink, streaming that 5-second segment to those simultaneous connections will take much longer than 5 seconds. As a result, the piece will already be obsolete by the time it actually gets cached – wasting bandwidth and causing endless buffering for everybody.
Instead, we want the server to fetch the segment from the backend exactly once, save it, and then serve that cached copy to everyone else. This is exactly what Nginx’s proxy_cache_lock directive does.
When enabled, if multiple clients request the same uncached file, the server will forward only the first request to the backend and put the others on hold. Once that first request finishes downloading and the file is in the cache, the server will unlock the rest of the requests – that will complete without touching the backend.
This way, the backend only ever streams each segment once, and the front-end server can comfortably handle hundreds of concurrent viewers without ever saturating the uplink. This setup essentially turns a cheap 30Mbps residential uplink into a stream that can handle hundreds of viewers, saving me from expensive dedicated line upgrades.

The difference is dramatic. Tracking a single connection and enabling proxy_cache_lock, the speed immediately increased from a buffering 50kbit/s to a rate of 300kbit/s, matching the camera bitrate.
Conclusions
With the webcam online and working, it was just a matter of sharing it around. The first users came from word of mouth and were friends, relatives, and their acquaintances. Traffic was mostly local, and I assume the usage was for checking the weather or watching the sunrise and sunset. I received daily screenshots from my parents, and even a brief downtime was enough for my local Linux User Group to activate within minutes, reporting the issue.
However, I wanted to make it public. I searched for “online weather camera” and found Windy, a weather map that shows webcams and also accepted community submissions. After adding it there the camera spread and got organically listed on various weather portals. Sometimes it was listed under the correct town, other times under the name of a town nearby.
While some platforms (sadly!) only show the scraped preview.jpg, others actually link to the website. The usage pattern is… unexpected.
Peak traffic mostly occurs during sunrise and sunset, with views coming either from local ISPs or from places like Germany, Russia, or France (namely, the French Riviera).
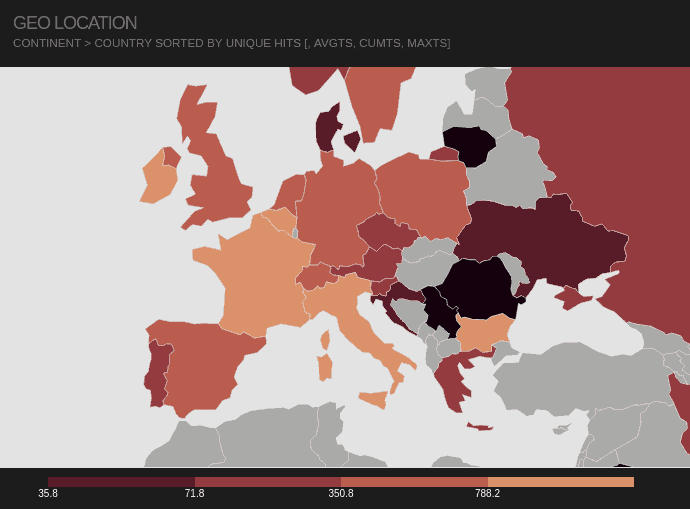
Nearby events such as the Festival di Sanremo and the Milano-Sanremo cycling race create distinct spikes in viewership, as well as weather events like big storms or unusual moon cycles.
At one point, I had somebody from Germany stream the feed for hours every day, starting exactly at 9:00 and ending at 17:00. Checking the User-Agent, it looked like a Smart TV. I would imagine they used the webcam as a living background, or maybe just forgot the TV on.
If you want to check out the camera, click here.
Thanks for reading!
-
… but check that the next segment’s ID is exactly the previous ID + 1, to avoid gaps or loops if the manifest refreshes oddly. ↩