Fixing a bit-rotten industrial machine
Bit rot is a phenomenon that eventually affects all digital storage media. It refers to the tendency of storage media to degrade over time, causing certain bits to flip, changing from a 0 to a 1 or vice versa.
Depending on the location and significance of the bits that degrade, various consequences can occur: best case scenario, it affects a pottion of the memory that is unused or contains non-critical data. Worst-case, bitrot makes the whole system unusable.
The network addon
This project started when the web interface of an industrial machine stopped working, preventing the owner from collecting data and monitoring its status. Although the built-in display (connected to a separate PLC) was working, the system became significantly more difficult to use without the web interface.
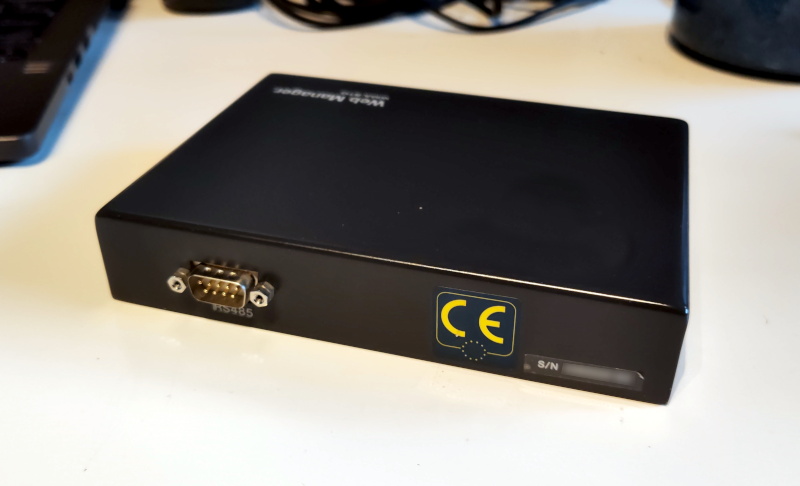
The web interface is managed by an external module that connects to the machine’s serial port and acts as a “bridge.” Inside, there is a small Linux-based computer that reads and writes data to an internal SD card.
Before starting to tinker with the device, it’s important to understand its current condition. Does it start? Is it frozen? What is it doing?
To understand what to expect from a 100% functional module, we can read the manual. Here is some useful information:
- DHCP is not supported: the only way to use the device is via a static IP
- the default credentials are “guest / guest”
- there is a web interface in http on port 80
Gaining access
The device was connected to a router and the network traffic was analyzed. My preferred method for gaining access to a device is by using the IPv6 link-local address, but it seems that IPv6 has been disabled, probably due to the device’s old age or an intentional configuration.
Not knowing the configured static IP address, we have to connect directly to the device and try every single IP until we receive a response, using the arp-scan program.
$ arp-scan -I enp4s0f4u2 192.168.0.0/24
Interface: enp4s0f4u2, type: EN10MB, MAC: 1c:bf:ce:fb:e3:63, IPv4: 192.168.88.52
Starting arp-scan 1.10.0 with 256 hosts (https://github.com/royhills/arp-scan)
192.168.0.102   00:11:0c:0f:7f:bb       Atmark Techno, Inc.
Now that we have discovered the IP address, we can reconfigure the network card and proceed with a scan to verify which services are still active.
$ nmap 192.168.0.102
[...]
Host is up (0.00088s latency).
PORT   STATE SERVICE
21/tcp open  ftp
23/tcp open  telnet
The fact that FTP and Telnet are available shows that the operating system has started, but the lack of http suggests a problem with the web server. The telnet server, probably left by the developers for convenience, is useful as it allows to gain direct access to the device’s console.
Before attempting a login, we can connect without credentials to obtain further information about the device by reading the system banner, which usually contains the hostname and other information.
$ telnet 192.168.0.102
Trying 192.168.0.102...
Connected to 192.168.0.102.
Escape character is '^]'.

atmark-dist v1.26.1 (AtmarkTechno/Armadillo-440)
Linux 2.6.26-at15 [armv5tejl arch]

WEB-MGR login:
AtmarkTechno is a Japanese manufacturer of embedded boards, and Armadillo-440 is the code name for an i.MX257 board that is now out of production. Fortunately, documentation and everything needed to restore the system from scratch if necessary are still available on their website.
The 2.6.26-at15 kernel was released in 2008, but by checking the Atmark archive, it seems this version was used until 2013.
Let’s try to enter with the “guest” credentials found in the manual: this password is meant to be used for the web interface, but developers often recycle passwords for simplicity.
WEB-MGR login: guest
Password: *****
[guest@WEB-MGR (ttyp0) ~]$
Success! Unfortunately, the guest user has very limited access to the machine. To gain full access, it is necessary to switch to the root user. If guest is in the “sudoers” list, this can be done with a simple command:
[guest@WEB-MGR (ttyp0) ~]$ sudo su -
[guest@WEB-MGR (ttyp0) ~]$
The sudo su - command brings us immediately back to the original console. Access denied.
Are there other users to try? By listing the folders inside /home/, we can guess who has access to the system.
[guest@WEB-MGR (ttyp0) ~]$ ls /home/
ftp/      guest/    hide/     ho/       mw/       wm/       www-data/
Among the various folders, hide immediately catches the eye: the name suggests a “hidden” service account created by the developers. Let’s try to authenticate using the same password as guest.
WEB-MGR login: hide
Password: *****
[hide@WEB-MGR (ttyp0) ~]$ sudo su -
[root@WEB-MGR (ttyp0) ~]#
Root obtained! Like in any self-respecting hacking movie, we entered through the backdoor.
Where is the web server?
Now that we have root access to the system, we can read and modify anything. First, let’s check if the server is running. Using the ps aux command, we get a list of processes, but no http server appears among them.
Before continuing, we need to understand which server we are looking for. It could be nginx, apache2, lighttpd, or maybe some basic embedded server like uhttpd.
Fortunately, in the /etc/ folder there is a lighttpd.conf file, which leads us directly to the server chosen by the developers.
Trying to run lighttpd, we are immediately stopped by an error:
[hide@WEB-MGR (ttyp0) ~]$ lighttpd
lighttpd: error while loading shared libraries: libz.so.1: cannot open shared object file: No such file or directory
libz is an external library, usually included in the base operating system, which handles compressing and decompressing files. Most modern web servers need it to implement HTTP compression, as HTML pages are very suitable for compression.
When lighttpd starts, a special program called a “dynamic linker” searches for and loads into memory all the libraries the software will need. System libraries, including libz.so.1, are usually found inside the /lib/ folder, but the linker also performs a search in other folders if necessary.
The fact that lighttpd tells us “No such file or directory” indicates that the library may have been deleted or corrupted to the point of becoming unreadable.
Save slot 1
Until now, we have limited ourselves to looking but not touching, avoiding causing additional errors on a memory that we already know is going bad.
To be able to work freely without the risk of destroying the only remaining copy of the data, it is useful to create a backup copy of the original operating system.
Fortunately, having root access already, we can use a combination of dd and netcat to send the entire contents of the SD card to a computer of our choice1. By moving the image to an external computer, we also gain the ability to use much more modern and powerful software, speeding up the work.
Where did the library go?
Now that the data is safe, we can investigate what happened to libz.so.1.
A quick check reveals that the file “libz.so.1” exists, and it is a shortcut pointing to the file “libz.so.1.2.3.3”.
By adding LD_DEBUG=libs before a command, we can ask the linker to describe every operation it performs.
[root@WEB-MGR (ttyp0) ~]## LD_DEBUG=libs lighttpd
   [...]
      2999:     find library=libz.so.1 [0]; searching
      2999:      search cache=/etc/ld.so.cache
      2999:      search path=/lib:/usr/lib/tls/v5l/fast-mult:/usr/lib/tls/v5l:/usr/lib/tls/fast-mult:/usr/lib/tls:/usr/lib/v5l/fast-mult:/usr/lib/v5l:/usr/lib/fast-mult:/usr/lib:/lib/arm-linux-gnueabi/tls/v5l/fast-mult:/lib/arm-linux-gnueabi/tls/v5l:/lib/arm-linux-gnueabi/tls/fast-mult:/lib/arm-linux-gnueabi/tls:/lib/arm-linux-gnueabi/v5l/fast-mult:/lib/arm-linux-gnueabi/v5l:/lib/arm-linux-gnueabi/fast-mult:/lib/arm-linux-gnueabi:/usr/lib/arm-linux-gnueabi/tls/v5l/fast-mult:/usr/lib/arm-linux-gnueabi/tls/v5l:/usr/lib/arm-linux-gnueabi/tls/fast-mult:/usr/lib/arm-linux-gnueabi/tls:/usr/lib/arm-linux-gnueabi/v5l/fast-mult:/usr/lib/arm-linux-gnueabi/v5l:/usr/lib/arm-linux-gnueabi/fast-mult:/usr/lib/arm-linux-gnueabi               (system search path)
      2999:       trying file=/lib/libz.so.1
      2999:       trying file=/usr/lib/tls/v5l/fast-mult/libz.so.1
      2999:       trying file=/usr/lib/tls/v5l/libz.so.1
      2999:       trying file=/usr/lib/tls/fast-mult/libz.so.1
      2999:       trying file=/usr/lib/tls/libz.so.1
      2999:       trying file=/usr/lib/v5l/fast-mult/libz.so.1
      2999:       trying file=/usr/lib/v5l/libz.so.1
      2999:       trying file=/usr/lib/fast-mult/libz.so.1
      [... a bunch of other tries here ...]

lighttpd: error while loading shared libraries: libz.so.1: cannot open shared object file: No such file or directory
The linker looks in /lib/, but then tries every other folder it knows. But libz.so.1 exists and is in /lib/. Why is it being ignored?
Is it possible that something replaced libz.so.1 with a completely different file? Out of curiosity, I tried using the file tool, which analyzes files and describes their content:
/lib$ file libz.so.1.2.3.3
libz.so.1.2.3.3: ELF 32-bit LSB shared object, *unknown arch 0x20* version 1 (SYSV)
   can't read elf program headers at 1073741876, missing section headers at 1130896
Ignoring “unknown arch”, the “can’t read elf program headers” error reveals the mystery: the file is completely corrupted.
In search of a libz.so.1.2.3.3
Even though libz is included in any computer with Linux (and probably Windows), we can’t just take any libz file and swap it into the system folder. As libraries evolve, their functionality changes, and newer versions become incompatible with previous ones.
Plus, this isn’t a normal computer but one based on an “ARM” CPU: even if the library was correct, the CPU wouldn’t know how to interpret it.
Fortunately, libz is so widespread that we can take for granted that it’s included in the system image created by the manufacturer. To get that exact version, we need to figure out when this library was created and find an image from that era.
## ls -lah libz.so.1*
-rw-r--r--  1 root root  81K 17 nov  2010 libz.so.1.2.3.3
The library was created on November 17, 2010, exactly the day before the release of this ISO image: https://download.atmark-techno.com/armadillo-440/iso/a400_20101118_free.iso
By downloading the ISO and extracting it, we get the entire original content of the /lib/ folder.
As a precaution, I compared all the original libraries with those on the board: they all matched, except for libz, which I replaced immediately.
Second attempt
Now that the library has been replaced, we can try running lighttpd again:
[root@WEB-MGR (ttyp0) /bin]## lighttpd
2026-04-08 17:44:12: (../../src/server.c.521) No configuration available. Try using -f option.
The error has changed: this means that libz has finally been loaded! lighttpd is simply telling us that it can’t find a configuration file. Let’s try providing it with the lighttpd.conf file we found earlier (and the -D option, so that lighttpd doesn’t run in the background):
[root@WEB-MGR (ttyp0) ~]## lighttpd -D -f /etc/lighttpd.conf
../../src/configfile.c.792: 0, (null)
As cryptic as this error might seem, a quick search indicates that it’s a syntax issue within the configuration file. Let’s take a look at what’s inside:
## lighttpd configuration file
#
## use it as a base for lighttpd 1.0.0 and above
#
## $Id: lighttpd.conf,v 1.7 2004/11/03 22:26:05 weigon Exp $

############ Options you really have to take care of ####################

## [���Ѥ���module������] modules to load

[... normal config file ...]

                              fastcgi.server = (
                   0".app" => (
      !                 "localhost" => (
                "      0    "socket" =>
                               "/tmp/app-Socket.socket"(
                                "max-procs" => 1,
                                "bin-path" => 2/mspec/srg/�pp.rb",
##              !        (      0 "bi�/environment" 5> ("TZ* =. "JST-9")
                       $)               `   �),
 (        � $       ".html" => (
                        "localhost  => (�             �  �           "socket" =>
 0 $                            "/tmp/app/socket2.socket",
  `                             "max-procs" => 1,
                               !"bin-path" => "/chamb/src/route.rb",
!`       "              )
         �          )
##               $    ".rb" => (
##                       "localhost" => (##       (    "                  "/tmp/ruby-socket.socket",
##                               "max-procs" =>"1,
##  $                            "Bin-path" => "/usr/bin/ruby"
##    "     (     (      )
##                    )
                )
This is the perfect example of bitrot! Inside the configuration file, some bits flipped and, depending on their position, caused:
- non-existent or invalid characters, now shown as “�”
- character substitutions: the
\n(newline) character before"localhost"became a space, merging two lines - case changes:
bin-pathbecameBin-path
And this is why bitrot is so dangerous: while losing an entire file makes the problem immediately obvious, bitrot subtly and gradually alters files until the system becomes too degraded to continue functioning. The danger is in the “ambiguity” of not knowing which files are intact and which files changed.
In this case, the bitrot had hit the beginning and the end of the file, while the middle part was completely intact.
Rewriting on the shoulders of those trained to rewrite
My lighttpd knownledge in combination with ruby isn’t deep enough to rewrite the file from scratch: consequently, I took inspiration from a method used to train the first LLMs.
BERT (created by Google in 2018) is a trained language model that used the “MLM” (Masked Language Modeling) method. The concept is simple: you give the model a text and replace some words with the [mask] token. The model’s goal is to replace the mask with the missing words and retrieve the original text.
Modern neural models, with billions of parameters, are able to perform this task very well. I replaced all the corrupted characters, or those that looked invalid to me, with the ? character, and then I used ollama with a local model and the following prompt to reconstruct the file.
This attachment is a config file of an old lighttpd server recovered from a corrupted sd card.
The bit rot caused bit flips that modified characters through the entire file.
Non-printable characters were replaced with question marks (?): those are supposed to be corrected.
Be aware of bit flips that cause subtle syntax errors such as missing semicolons, case folding and letter replacements.
Provide a corrected file. Do not rewrite it, reorder options or optimize. Only edit the corrupted parts.
Despite the prompt, modern models unfortunately tend to want to “help” too much and often rewrite from scratch, optimize, or rework the input rather than just modifying it.
So, instead of blindly trusting the model’s output, I manually verified and applied the differences line by line, integrating only the actual fixes and ignoring the extra comments added by the LLM.
Despite the configuration file now being valid and the server running, the web interface was reachable but showed a blank page. Checking the log file, a problem emerged in a ruby file responsible for the interface.
Since the disk was now confirmed to be corrupted and I didn’t know for sure if there were other damaged files, I decided to check them all.
Statistically, a ruby file affected by bitrot will have at least one non-ASCII character (). When the file command analyzes a file with non-ASCII characters, it classifies it as “binary data.” We can therefore search for all ruby files classified this way to get a list of the corrupted ones.
## Feed all the *.rb files to the "file" command, then only include lines that match binary data
$ find . -name '*.rb' -exec file {} \; | grep 'binary data'
./RqstHndl.rb: a /usr/bin/ruby -I/chamb/src -Ku script executable (binary data)
Only RqstHndl.rb turned out to be corrupted, and it was repaired using the same method adopted for the configuration above.
Success!
Opening the interface from a browser, the interface described in the manual finally appeared:
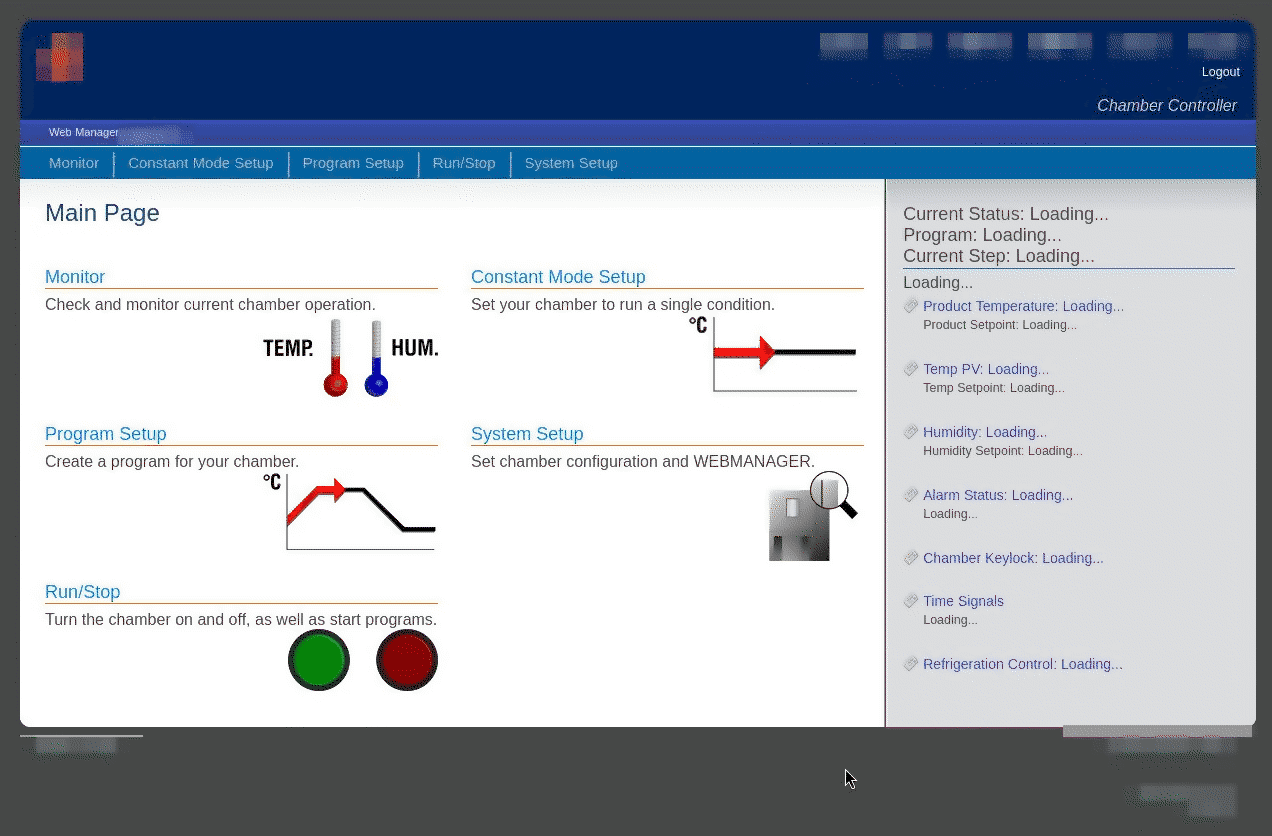
SD Replacement
The interface is visible and working. However, the SD card it was running on had already shown signs of instability. It is therefore necessary to replace it with a new and, ideally, longer-lasting one.
Opening the module’s casing is easy: inside there is only an SBC with an additional board that maintains the date and time (RTC) and a supplementary RS485 interface used for the connection to the machinery’s PLC.
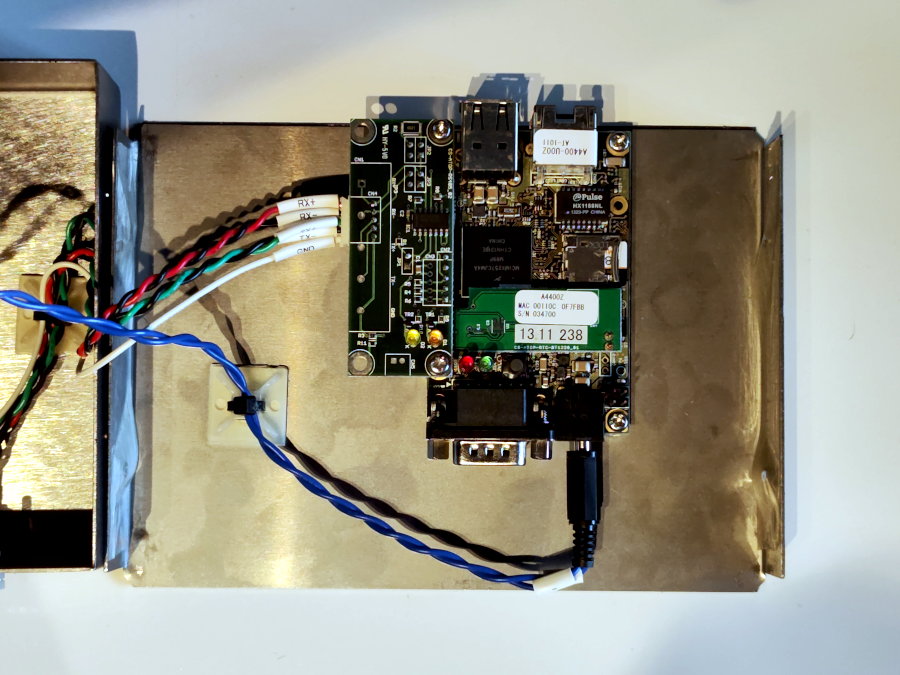
The internal filesystem is only 2 GB, but the usage of a card rated as “High Endurance” combined with higher capacity (16GB) to distribute writes over a larger area, will make it even more unlikely for the defect to occur in the future (or at least, until the machinery is decommissioned).
A new boot was attempted to verify compatibility with the new card, this time observing via serial port for the presence of additional errors. Not everything went smoothly:
[... bootloader and kernel boot above ...]
Running local start scripts.
Starting udevd: udevd[164]: add_to_rules: unknown key 'KERN�L' in /etc/udev/rules.d/z99_usb_image_update.rules:1
udevd[164]: add_to_rules: unknown key 'B�S' in /etc/udev/rules.d/z99_usb_image_update.rules:1
udevd[164]: add_to_rules: unknown key 'KERNML' in /etc/udev/rules.d/z99_usb_image_update.rules:2
udevd[164]: add_to_rules: invalid rule '/etc/udev/rules.d/z99_usb_image_update.rules:2'
                                                                done
Loading /etc/config:                                            done
Changing file permissions: udevd-event[227]: run_program: exec of program '/bi�/sh' failed
udevd-event[229]: run_program: exec of program '/bi�/sh' failed

[... infinite loop of run_program ...]
These errors allowed us to identify other files that needed fixing in /etc/profile and /etc/udev/rules.d/. Also, the errors were generating an infinite loop of writes to the system log, overwhelming the SD card with data.
It’s possible that this small error in the udev rule caused all the other problems.
Filesystem Check
Before declaring the system safe, it is necessary to use fsck.ext3 on the partition to find and fix any remaining errors. Usually, fsck repairs filesystem errors and moves orphaned or unrecoverable files to the lost+found/ folder.
$ sudo fsck.ext3 -v -y /dev/sdb1
e2fsck 1.47.3 (8-Jul-2025)
/dev/sdb1 contains a file system with errors, check forced.
Pass 1: Checking inodes, blocks, and sizes
Pass 2: Checking directory structure
Directory entry for '.' in ... (64209) is big.
Split? yes

Directory inode 64209, block #0, offset 12: directory corrupted
Salvage? yes

Pass 3: Checking directory connectivity
'..' in /etc/config.bak (64209) is <The NULL inode> (0), should be /etc (64001).
Fix? yes

Couldn't fix parent of inode 64209: Couldn't find parent directory entry

Pass 4: Checking reference counts
Pass 5: Checking group summary information

/dev/sdb1: ***** FILE SYSTEM WAS MODIFIED *****

/dev/sdb1: ********** WARNING: Filesystem still has errors **********


       4583 inodes used (3.82%, out of 120000)
         39 non-contiguous files (0.9%)
          1 non-contiguous directory (0.0%)
            ## of inodes with ind/dind/tind blocks: 146/1/0
      37720 blocks used (7.86%, out of 479990)
          0 bad blocks
          1 large file

       3687 regular files
        268 directories
        132 character device files
        133 block device files
          0 fifos
 4294967295 links
        353 symbolic links (353 fast symbolic links)
          1 socket
------------
       4573 files
There’s still a problem. Ironically, the backup of the configuration files itself is preventing fsck from repairing the filesystem.
To understand what’s happening, we need to take a step back and explain what an inode is.
In filesystems like ext3, the name associated with a file is just a convenient label given by the user to identify it.
The actual data and file metadata (permissions, size and where the physical blocks are located on the disk) are stored in a data structure called an inode, to which is assigned a unique number.
When the system looks for /etc/config.bak, it’s actually looking for the inode associated with that name: 64209.
Looking at the final fsck report, a bizarre value stands out: the filesystem reports 4,294,967,295 links (hard links). Since every link is, in turn, associated with an inode, it’s technically impossible to have more links than inodes.
Furthermore, the number corresponds exactly to 0xFFFFFFFF, which is the largest 32-bit integer representable - a coincidence too strange to be accidental.
This off-the-charts value is caused by inode 64209, which the system associates specifically with the /etc/config.bak folder, the very one blocking fsck.
Unfortunately, attempting to delete that folder using the normal rmdir command causes an immediate system crash. To resolve the situation, we need to act at a low level: we’ll have to use debugfs, a tool that allows for “surgical” modification of the filesystem by acting directly on the inodes.
## debugfs -w /dev/sdb1
debugfs 1.47.3 (8-Jul-2025)
debugfs:  stat <64209>
Inode: 64209   Type: directory    Mode:  0775   Flags: 0x0
Generation: 3813769555    Version: 0x00000000:00000000
User:     0   Group:     0   Project:     0   Size: 4096
File ACL: 0
Links: 2   Blockcount: 8
Fragment:  Address: 0    Number: 0    Size: 0
 ctime: 0x4e264393:00000000 -- Wed Jul 20 04:55:15 2011
 atime: 0x69d67a22:60bfcb28 -- Wed Apr  8 17:54:10 2026
 mtime: 0x4e264393:00000000 -- Wed Jul 20 04:55:15 2011
crtime: 0x00000000:00000000 -- Thu Jan  1 01:00:00 1970
Size of extra inode fields: 32
BLOCKS:
(0):268290
TOTAL: 1

debugfs:
The tool provides an interactive shell. By typing ncheck 64209, we can verify which path corresponds to the corrupted inode:
debugfs:  ncheck 64209
Inode   Pathname
64209   /etc/config.bak
As suspected, it’s the backup. Since it’s an empty folder, we can remove it directly through the filesystem:
debugfs:  rmdir /etc/config.bak
debugfs:  quit
We’re ready to run the check again. If removing the folder caused any other inconsistencies in the filesystem, fsck will be able to handle them and finish the repair, resulting in a 100% clean filesystem.
## fsck.ext2 /dev/sdb1
e2fsck 1.47.3 (8-Jul-2025)
/dev/sdb1 contains a file system with errors, check forced.
Pass 1: Checking inodes, blocks, and sizes
Pass 2: Checking directory structure
Pass 3: Checking directory connectivity
Pass 4: Checking reference counts
Pass 5: Checking group summary information
/dev/sdb1: 4582/120000 files (0.9% non-contiguous), 37719/479990 blocks
The system has been completely restored. As a precaution, a disk image of the final result was created to allow for a full restore in case of future problems.
Conclusions
When designing an embedded device, especially one that must operate unsupervised for decades, proper attention to filesystem integrity is crucial. Bit flips will happen sooner or later, and the system must be able to repair or, at the very least, detect them.
There are several ways to make a system more robust:
- Keep the system read-only: separate user and system data into different partitions and allow writing only to the user partition.
- Consider the possibility of total corruption: have an extra partition for a “factory” or “recovery” image that can return the device to its factory state.
- If possible, run everything from memory: even if embedded RAM is rarely ECC, any problem can be resolved with a reboot.
- Write atomically and validate writes (CoW): instead of overwriting configuration files directly, write them elsewhere and then move them to the destination.
- Log only the essential and defragment writes: there is no need to write continuously to the SD card. When moving the device into production, reduce the commit frequency so that writings happen in big batches, or disable logs entirely.
- Use modern filesystems with “checksum” and “scrub” functions, which check and rewrite corrupted data before it is lost completely.
All of this can be easily implemented with Open Source projects like Yocto Linux, Alpine Linux, or community projects like DietPi.
-
Ideally, a disk image should be created with the system powered off, as doing so on a running system will 100% produce an inconsistent image. It is not a major issue here since the filesystem is already corrupted and the files we need are never modified. ↩